A filter changes the whole mood of a photo or video. The same shot can be a warm, nostalgic memory in Sepia, a stark and dramatic one in Noir, or a bold graphic poster in Posterize—without anything about the photo or video itself changing.
SlideFlow brings ten creative filters to your slideshows on Mac, iPhone, and iPad. But the part people tend to miss is that you don’t pick one. You pick a set, and SlideFlow varies them as your slideshow plays—so the same photo library keeps showing you something new, and you never have to keep a dozen edited copies of a photo just to see it in a dozen different ways. The set you pick belongs to the slideshow, so it follows it to your other devices.
What a slideshow filter actually does
A filter in SlideFlow is applied while the slideshow plays. It is not an edit.
That distinction matters more than it might sound. Applying a filter doesn’t change a single file. The original in your Photos library or your files folder stays exactly as it was, and the filter exists only as a setting on the slideshow. Change your mind, and you change a setting—there’s nothing to undo and nothing to clean up.
It also means filters apply to videos as well as photos. A clip shot on your phone plays back in the same Noir or Sepia treatment as the stills around it, so a mixed slideshow holds together as one piece rather than switching look every time a video comes up.
The ten filters in SlideFlow
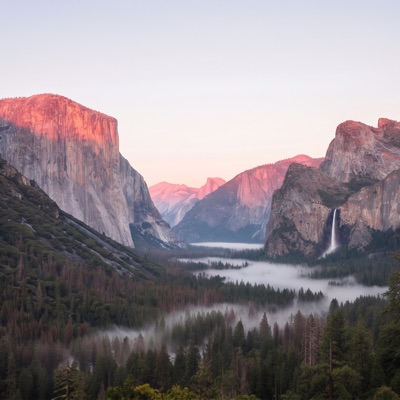
Every filter is shown as a live thumbnail in the app, rendered from the first photo in your slideshow, so you judge the actual effect on your own picture instead of guessing from the name. Much of what follows is a description of a difference—warmer, cooler, more contrast, less color—so it’s worth having the starting point in front of you. Here is the photo, unfiltered:
And here is the filter screen, showing that same photo through all ten:
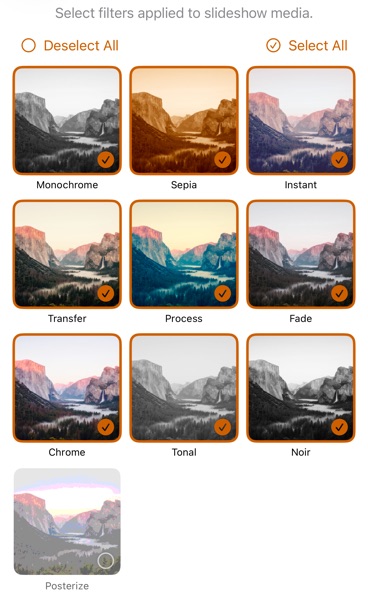
In the order they appear on screen, the ten are Monochrome, Sepia, Instant, Transfer, Process, Fade, Chrome, Tonal, Noir, and Posterize. They fall into four rough groups.
Black and white — Monochrome, Tonal, Noir
Three answers to the same idea, and the difference between them is contrast.
- Tonal — the gentlest of the three: it converts to black and white while leaving the original tonal range largely as it was, so you get soft greys and no harsh blacks. Flattering for portraits and quiet scenes.
- Monochrome — the everyday choice, a film-style black and white with a bit more punch.
- Noir — the furthest: exaggerated contrast, deep blacks, bright highlights, the look of classic black-and-white cinema.
Pick by how much drama you want.
Vintage and film — Sepia, Instant, Transfer, Fade
- Sepia — the classic warm brown of an aged photograph.
- Instant — shifts the colors toward the cool, slightly washed-out palette of instant film.
- Transfer — pushes the other way, emphasizing warmth and giving the image a distinctly aged-print feel.
- Fade — drains most of the color out and softens the contrast, so the image looks gently sun-bleached.
All four suggest the past, which makes them a natural fit for family archives and old scans.
Color-shifting — Process, Chrome
- Process — pushes strong cool cyans and greens through the image, the stylized look of cross-processed film.
- Chrome — goes the opposite direction, and is the subtler of the two: exaggerated, richer color, closer to a photo that has simply been graded well than to an obvious effect.
Graphic — Posterize
- Posterize — the odd one out, and the strongest of the set. Rather than reaching for a photographic look, it reduces the image to a small number of color levels, collapsing smooth gradients into flat bands—a photograph turned into something closer to a screen print.
Used on everything it’s overwhelming; used as one of several filters, it lands as an occasional striking frame.
Eight of the ten are photo effects built around a photographic look—a film stock, an instant print, a development process—which is why they sit together so comfortably when you enable several at once. Sepia and Posterize are built differently: each is a single, direct color operation rather than a styled effect. With Sepia you’d never know, because a sepia tone is itself a photographic look. Posterize is the one that breaks the pattern—its operation is a graphic one, not a photographic one, and that is why it stands out so sharply next to the others.
Pick a set, not a single filter
The filter screen isn’t a single-choice list. Look again at the screenshot above: every filter has its own selector and can be checked independently, and Select All and Deselect All at the bottom of the screen cover the extremes.
That gives you three genuinely different ways to use filters:
- None selected (the default). Your photos and videos play exactly as they are.
- Exactly one selected. A consistent treatment across the whole slideshow. This is what you want for a deliberate piece—an all-black-and-white tribute, or a set of old family scans unified in Sepia.
- Several selected. SlideFlow varies among them as the slideshow plays. This is the option worth understanding properly, and it’s what the rest of this guide is about.
See your photos in a new way again and again
Select several filters and your slideshow stops being a fixed thing. The photo that came up in Sepia last time returns as Noir, then as Chrome. Nothing about the photo changed—only the way you’re seeing it.
The variation is even-handed. SlideFlow works through the whole set you enabled, in a random order, before any filter comes round a second time—so with six filters selected, each one lands on one photo in six. That’s unlike transitions, where the quiet ones are deliberately weighted to come up more often than the eye-catching ones.
That turns out to matter for a reason that has little to do with special effects. Most of us have photo libraries we’ve stopped really looking at: we know those pictures, we scrolled past them years ago. A restyled version breaks that familiarity. A holiday snapshot in Noir shows you the composition instead of the memory; a portrait in Tonal shows you the expression instead of the sweater. You notice things in your own photos that you’d long since stopped seeing.
Filters and looping slideshows
This is at its best with Repeat slideshow turned on.
A looping slideshow is usually background scenery—playing on a TV at a family gathering, or on a Mac during an event. The problem with background scenery is that people stop noticing it after the second loop, because they’ve already seen it. With several filters enabled, they haven’t: each pass restyles your photos and videos again, and the slideshow keeps drawing eyes back to it instead of fading into wallpaper.
Stack it with the other two sources of variation and the effect compounds:
- Shuffle photos & videos changes the order.
- Filters change the look.
- Shuffled music tracks change the sound.
Together, they make the same slideshow feel new on every loop—leave it running all evening and it never quite repeats itself.
No duplicate copies, no bloated library
There’s a practical argument here too, and it’s the one that separates a playback filter from an editing app.
Suppose you wanted to keep a photo in several looks in your photo library. You’d have to duplicate it once per style: one copy in black and white, one in sepia, one posterized. Ten photos in five styles is fifty items. A hundred photos is five hundred.
That costs storage, and for videos it costs a great deal of it—a duplicated video can take far more storage than a duplicated still, so keeping even a few videos in multiple styles gets expensive fast.
But the bigger cost isn’t storage, it’s the mess. Near-identical copies scatter through your timeline. They turn up alongside the original in searches, albums, and other parts of your photo library. Six months later you’re looking at five versions of the same picture, trying to remember which one was the original—and the answer to “do I still need this copy?” is never obvious, so you keep them all.
SlideFlow avoids the whole problem. Filters are applied during playback, so:
- No styled duplicates pile up in your photo library—the original stays there, untouched.
- You can see that photo in as many styles as you like, in as many slideshows as you like.
- Different slideshows can use completely different filters on the very same photos.
- Changing your mind costs nothing—there are no files to delete and no library to tidy up.
How to choose filters for a slideshow
- Open a slideshow.
- Open the slideshow settings with the Customize button, or from the toolbar menu.
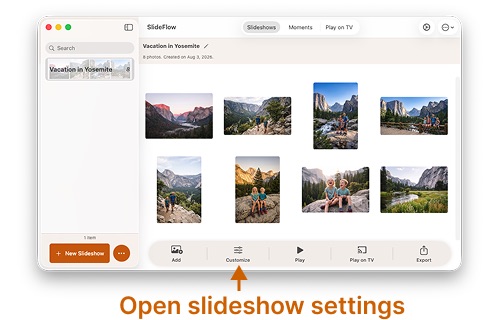
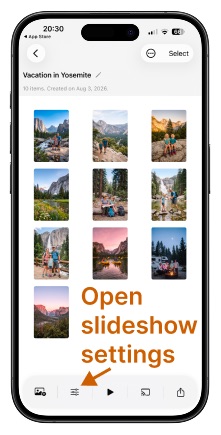
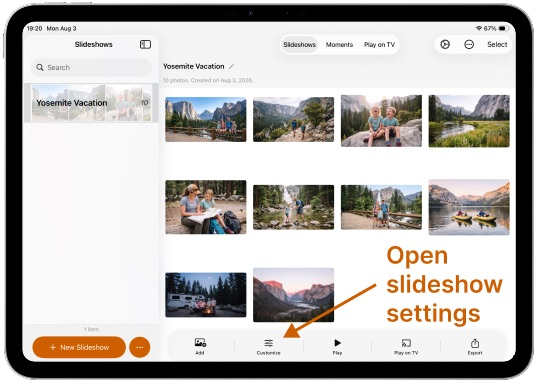
- Click or tap Filters in the General section.
- Select the filters you want. Each one is a live thumbnail rendered from the first photo in your slideshow, so you can judge it on the spot rather than by name.
- Play the slideshow. SlideFlow generates it on the fly, so you see the result within seconds and can go straight back and change your mind.
The steps are the same on Mac, iPhone, and iPad.
A different filter for one photo or video
Sometimes a single image doesn’t want the treatment the rest of the slideshow is getting—a photo that’s already black and white, or one that carries the emotional weight of the whole slideshow and should be seen plainly.
Open the settings for that individual photo or video and you’ll find a Filter control of its own. It starts at Use Slideshow, meaning it follows the slideshow like everything else. Pick a specific filter instead and it applies to that one item only—or pick None to exempt it from filtering altogether while the rest of the slideshow carries on as before.
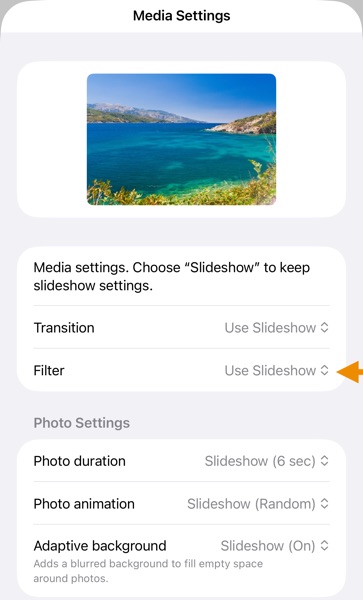
Videos work the same way here. They have fewer settings than photos overall—no duration or animation, since a video brings its own—but Filter and Transition are both there for a video just as they are for a photo.
Which level should you set filters at?
SlideFlow has three levels of settings: the Default Slideshow Settings for all new slideshows, which live in SlideFlow’s own settings rather than in any slideshow, then the slideshow itself, and finally individual media. For filters, the guidance is straightforward:
- The slideshow level is where filters belong. A look is nearly always a decision about one particular slideshow—this one is a nostalgic family archive, that one is a modern travel recap.
- Leave the Default Slideshow Settings at none, unless a signature style really is how you want every new slideshow to start. Filters are the one setting where the default of “no filter” is right for most people most of the time.
- Use the media level for exceptions, not for building up a look photo by photo.
Filters in exported videos
Everything you see while the slideshow plays goes into the file when you export it as a video. Filters are rendered into the exported MP4, and—as always—your originals stay untouched.
One thing to know if you’ve enabled several filters: like shuffling, the variation is resolved at the moment you export. The exported file captures one particular run, with one particular arrangement of filters, and keeps it. That’s unavoidable in a fixed video file, and it’s a good reason to keep playing the slideshow directly when the ever-changing version is the point, and to export when you need something to hand to someone else.
Which filters should you choose?
- A family archive or old scans — Sepia, Transfer, or Fade. They suit material that already looks like the past, and they hide the color casts that old prints and scans tend to have.
- A tribute or memorial slideshow — Monochrome or Tonal, on their own. Restraint reads as respect here; save the variation for happier occasions.
- A party or holiday recap — several filters at once, with Repeat slideshow on. This is the case the multi-filter behavior was made for.
- A slideshow you’ll watch again and again — several filters, including at least one strong one such as Noir or Posterize, so some frames genuinely surprise you.
- A polished presentation or professional portfolio — one filter or none. Chrome can add a subtle lift without making the effect too obvious.
- Photos you’re proud of as photographs — none. If you’ve already edited them the way you want them, a filter is just something in the way.
A few tips
- Preview before deciding. Playback starts almost immediately, so trying a different set of filters costs seconds. Judge the look on your own photos rather than on the thumbnails.
- Strong filters work better in small doses. Posterize across an entire slideshow is exhausting; Posterize as one of six filters is a moment that makes people look up.
- Mind the mood. Filters carry emotional weight. A cheerful birthday slideshow in Noir sends a confusing signal.
- Don’t fight your own editing. If your photos are already color-graded, filters stack on top of that work rather than replacing it.
- Filters and transitions are separate decisions. Both are multi-select, both add variety, and enabling everything in both at once is usually too much.
(Note: New to SlideFlow? The step-by-step tutorials for Mac or iPhone and iPad walk you through your first slideshow in a few minutes. For every other setting, see customizing slideshow settings. More questions are answered in the SlideFlow FAQ).