SlideFlow is built so that you never have to open the settings. Add your photos and videos, press play, and you already get a slideshow with animations, transitions, and music—the built-in defaults are chosen to produce a good result on their own. Every new slideshow even gets its own random set of music tracks, so they don’t all open with the same song, and the transitions and the track order are picked afresh each time you press play, so a slideshow never quite repeats itself.
But sooner or later you’ll want something specific: a slower pace for landscape photos, a title card with the name of the trip, one particular photo held a little longer, or a black-and-white look throughout. That’s what the settings are for. This guide walks through every slideshow setting SlideFlow offers, what it actually does, and—just as important—where to set it. It covers all three settings levels—the app-wide defaults, one slideshow, and one photo or video—and every setting available at each level, on Mac, iPhone, and iPad.
Three levels of settings
Most slideshow makers give you one settings screen. SlideFlow gives you three levels, and understanding them is the single most useful thing to know before you start changing anything:
- Default Slideshow Settings apply to every slideshow you create from now on. Set your favorite pace, transitions, and animations once, and every new slideshow starts out the way you like it. Changing them does not touch slideshows you already made.
- Slideshow Settings apply to one slideshow, and to every photo and video in it that has no settings of its own. This is the level you’ll use most.
- Media Settings apply to a single photo or video, and override the slideshow settings for that one item.
Those three names are the app’s own, printed at the top of each screen, so you can go looking for them by name. Note that the default settings are the odd one out in where they live: they belong to the app rather than to any slideshow, so you’ll find them in SlideFlow’s settings and not in the slideshow you happen to have open.
Each level falls back to the one above it. A photo with no settings of its own follows the slideshow; a new slideshow starts from the Default Slideshow Settings. That’s why the media settings screen shows values like Slideshow (6 sec)—it’s telling you where the value is coming from, not just what it is.
The three levels hold almost the same settings, with a few sensible exceptions noted below. Let’s start with the middle level, since it’s the one you’ll open most often.
Slideshow Settings
Open the slideshow settings with the Customize button, or from the toolbar menu.
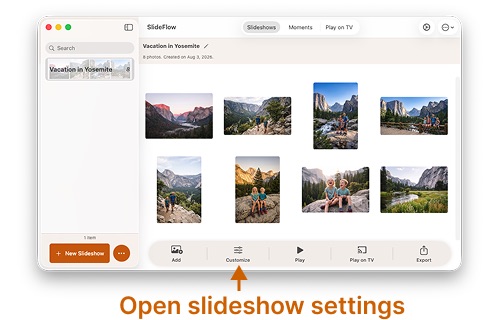
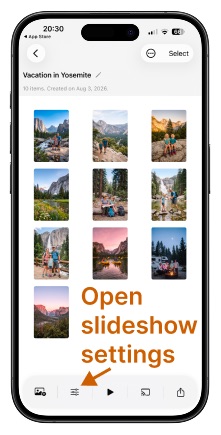
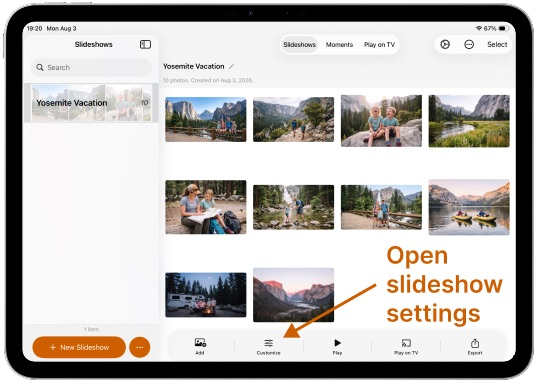
Everything here applies to this slideshow only. The screen is grouped into three sections—General for the settings that shape the slideshow as a whole, Photo Settings for the ones that only touch photos, and Overlays (titles, images)—and the ? button next to the title opens this guide.
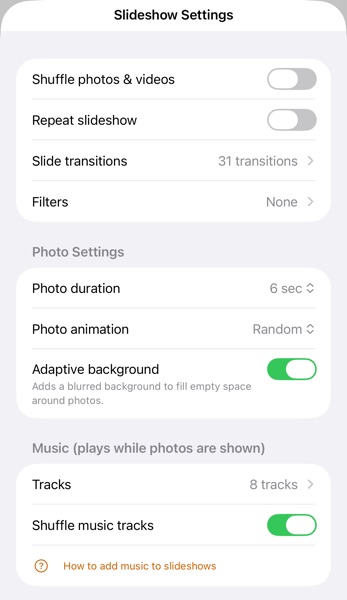
Shuffle photos & videos
Off by default, so your media plays in the order you arranged it—which is usually what you want for a trip or an event that has a chronological story to tell.
Turn it on and SlideFlow plays photos and videos in a random order, picking a new one every time. This is the setting for a slideshow you leave looping at a family gathering, or one you come back to every few months: it feels like a different slideshow each time rather than a rerun of the same one.
One thing to keep in mind: shuffling is resolved at the moment you export a video. The exported file captures one particular random order and keeps it forever. If you want the video to match what you previewed, switch shuffle off before exporting.
Repeat slideshow
Off by default. Turn it on and the slideshow starts again from the beginning when it reaches the end, instead of stopping.
This is what you want when the slideshow is background scenery—playing on a TV at a party or on a Mac during an event. Combine it with Shuffle photos & videos and a few creative filters, and every pass looks different enough that people keep noticing it. Note that this applies to playback only; an exported video is a fixed-length file that ends when it ends.
Music
Music is a single row in General, showing how many tracks this slideshow has, with the rule printed underneath it: music plays while photos are shown. Your videos bring their own sound, so the background music accompanies the photos and steps aside for videos.
Open the row and you land on the Music Tracks screen. New slideshows already arrive with eight built-in tracks picked at random across a few moods—happy, romantic, and relaxed—so there’s nothing to set up. Here you can preview each track, drag them to reorder, and remove them one at a time or with Remove All. Add Music adds more: built-in tracks, your own audio files, or—on iPhone and iPad—a song from your Music app’s library. Your audio files all live in the shared My Music library and sync across your devices.
Shuffle music tracks is on that same screen, above the track list, and is on by default. On means a random order every time you play, which is part of what makes a repeated slideshow feel fresh. Off means they play top to bottom in the order shown, which is what you want if you have a specific opening track in mind or you want the mood to build across the slideshow. The toggle only appears once the slideshow has at least two tracks—with one track, or none, there’s nothing to shuffle.
Music has enough depth to deserve its own guide—see making a photo slideshow with music for the full picture, including the differences between audio files and your Music library, and how the music fades out on its own before a video with sound and at the end of the slideshow.
Filters
Filters restyle your photos and videos as they play. Ten are available—Monochrome, Sepia, Instant, Transfer, Process, Fade, Chrome, Tonal, Noir, and Posterize—each shown as a thumbnail rendered from the first photo in your own slideshow, so you judge the effect on your own material rather than guess from the name. By default none are selected, so you see your media as it is.
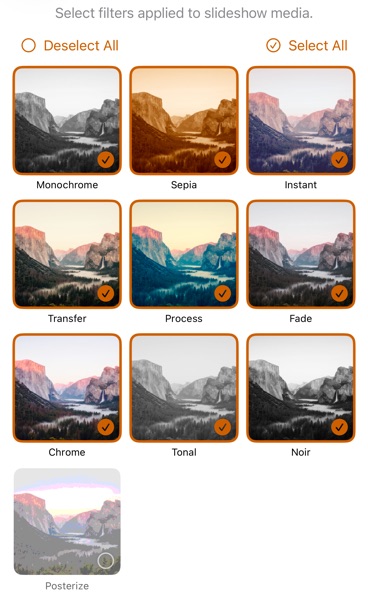
Filters work like transitions: you select a set, not a single one. Select exactly one for a consistent treatment across the whole slideshow. Select several and SlideFlow varies them as the slideshow plays, so the same photo comes back in a different style every time—which is why filters pair so well with Repeat slideshow. And because filters are applied during playback, your library keeps one untouched original instead of a duplicate copy per style.
Filters are available in the Default Slideshow Settings too, so you can have every new slideshow start from your favorite ones. Most people are better off leaving that at none and choosing per slideshow, though: a look is nearly always a decision about one particular set of photos, and a default filter applies itself to slideshows you haven’t thought about yet.
See all ten filters and what they do →
Slide transitions
A transition is how one photo gives way to the next. Open Slide transitions and you get the full catalog of thirty-three, grouped into seven families—Dissolve, Wipe, Slide, Dynamic, Effects, 3D, and Shapes.
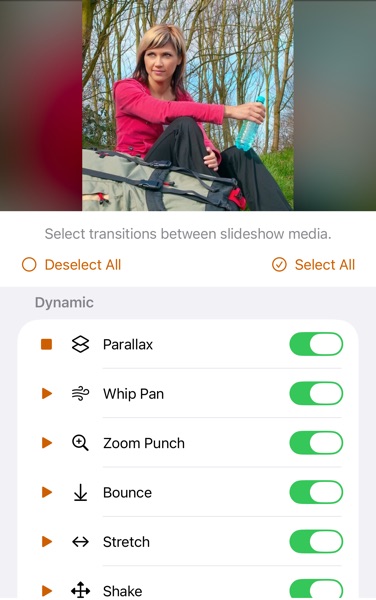
The important detail: this is not a single choice, it’s a selection. Each transition has its own switch, and SlideFlow varies among all the ones you’ve enabled as the slideshow plays. That’s why the settings screen says something like 31 transitions instead of naming one—it’s telling you how many are currently switched on. Thirty-one is also what a new slideshow starts with by default: everything except Circle Close and Spin Out, the two that read as an ending and may be confusing in the middle of a slideshow. Those two aren’t wasted, though—they’re two of the choices for the ending transition, where reading as an ending is the whole point. A large selection gives variety; one or two give a consistent, restrained look. Select All and Deselect All at the bottom of the screen save you from toggling thirty-three switches by hand, and each of the seven families carries a button of its own in its header—reading Select All, or Deselect All once the whole family is on—for taking a group in or out at once. The play button next to each transition previews it.
Transitions are the setting most worth curating in the Default Slideshow Settings: enable the ones you like once, and every new slideshow starts from your own selection.
See all transitions and how to choose them →
Ending transition
Every other transition belongs to the photo arriving: it defines how that photo comes in—from black for the first one, from the previous photo for all the rest. Nothing arrives after the last photo, which is why the end of a slideshow needs a setting of its own rather than a transition set on the final item. This is the one transition that runs outward: the last frame goes to black, and the music fades out in step with it, so the picture and the sound finish together instead of both being cut off mid-note.
There are four choices. The first three all land on black; only the motion differs. Fade Out is the default and the neutral one: the last frame simply dissolves away. Spin Out spins the photo and shrinks it to nothing. Circle Close contracts it into a closing iris—the old-film ending. None switches the ending off, and the slideshow stops on its last frame—the music still fades out rather than being cut, it just does so over the last seconds of the final photo instead.
It runs slower than a transition between two slides on purpose: three seconds, where a mid-slideshow transition takes 0.6 to 2. Between photos, lingering reads as sluggish; at the end it reads as deliberate—and it’s the room a piece of music needs to finish rather than stop.
You’ll see it whenever the slideshow reaches its end—which is not always. With Repeat slideshow on, playback never reaches the end, so the ending never plays. An exported video always ends, regardless of the repeat setting, so there you always get it. That makes this the setting that decides how your video signs off.
Like overlays, the ending belongs to the slideshow as a whole: there’s no per-photo version of it, because there’s only one ending.
Photo Settings
These three apply to photos. Videos are left alone—they play at their own length and speed, with whatever motion the camera already recorded.
Photo duration is how long each photo stays on screen, six seconds by default, and anything from one second to five minutes if you pick another value. It’s the setting with the biggest effect on how your slideshow feels. Shorter durations create a brisk, energetic recap; longer ones give people time to actually look at each photo. As a rule of thumb, speed up for a quick highlight reel of a party, and slow down for landscapes, portraits, and anything with detail worth studying. Also consider the total, and remember that each transition adds its own 0.6 to 2 seconds on top: fifty photos at six seconds each is close to a six-minute video, which is a long time to hold an audience.
Photo animation decides how each photo moves while it’s on screen. Static photos shown one after another get tedious quickly; gentle motion turns a sequence of images into something that feels filmed. Every option is a zoom, and the real choice is what the zoom aims at. The Subject options—Zoom In on Subject, Zoom Out from Subject, and Zoom In or Out on Subject—look for faces first and, when a photo has none, zoom on the area the AI finds most interesting, so a landscape or a close-up of a plate of food gets motion too. The Faces options—Zoom In on Faces, Zoom Out from Faces, and Zoom In or Out on Faces—are stricter: they animate only photos where faces are found, and leave the rest still. In both groups, zooming in opens on the full scene and then moves in on what matters; zooming out does the reverse, starting close and pulling back to reveal the surroundings; and the in or out options pick a direction afresh for each photo. The default is Zoom In or Out on Subject, and None turns the movement off. You can see the effect in the final video of our Mac tutorial.
The strictness of the Faces options is a feature, not a gap: choose one of them when only the photos of people should move, and everything without a recognizable face holds steady by design, not by accident. When every photo deserves a little motion, keep the default or another Subject option.
Adaptive background fills the empty space around a photo that doesn’t match the video frame with a blurred version of the photo itself. It’s on by default, and you’ll usually want to leave it there. Turn it off and those areas are plain black instead.
This matters more than it sounds, because your photos are not all the same shape, and neither is the frame you play or export in. A vertical photo in a horizontal 16:9 frame leaves a lot of space on both sides. It matters most of all when you export vertical or square video for Instagram, TikTok, or YouTube Shorts, where most ordinary photos won’t fill the frame at all.
Overlays (titles, images)
Overlays sit on top of the slideshow: a title for the occasion, or your own logo in a corner. Use Add overlay to create one—up to five per slideshow—then open it to configure it.
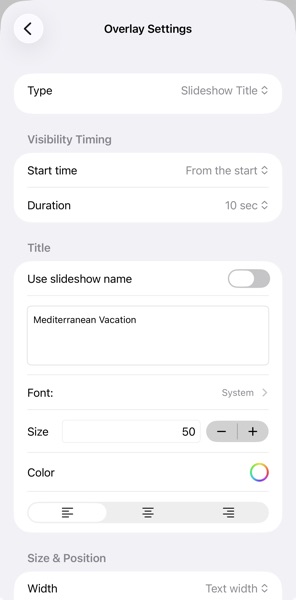
An overlay is either a Slideshow Title or an Image. A title can pick up the slideshow’s own name automatically—rename the slideshow and the title follows—or show text you type yourself, in the font, size, color, and alignment you choose. An image is any picture you drop in or browse to—like imported photos and videos, it’s copied into the slideshow and synced to your other devices along with it.
Both kinds then share the same three groups. Visibility Timing sets when the overlay appears and how long it stays, from a couple of seconds to the end of the slideshow, which is how you make a title card sit over the opening photos and then get out of the way. Size & Position sets how wide it is and places it with a nine-cell grid of arrows. Background puts an optional fill behind it, in any color and opacity—the thing that makes text readable over a busy photo.
Overlays belong to a specific slideshow, so you won’t find this section in the Default Slideshow Settings.
The four settings that make every playback different
Four of the settings above do something the rest don’t: instead of fixing a look, they vary one. Together they’re what keeps a slideshow from becoming a recording you’ve already seen.
- Shuffle photos & videos changes the order.
- Slide transitions change the movement—enable a set and SlideFlow varies among them as it plays.
- Filters change the look, so a photo that came up in Sepia returns in Noir.
- Shuffle music tracks changes the sound.
None of the four is decided in advance. SlideFlow builds the slideshow as it plays rather than rendering it up front, so those choices are made at playback—which means they’re made afresh every time you press play, and again on every pass when Repeat slideshow is on. Play the same slideshow twice in a row and you get two different slideshows out of the same photos.
That’s the difference between a slideshow you watch once and one you can leave running. A looping slideshow at a family gathering is background scenery, and background scenery stops being noticed after the second loop—unless it keeps changing. With all four on, it never quite repeats itself.
There’s a second thing you get from it: a way to see your own photos again. Most of us have libraries we’ve stopped really looking at, and a snapshot arriving in Noir—or after a whip pan rather than a fade—breaks that familiarity enough to show you the composition instead of the memory. Filters are where this pays off most, and they cost you nothing in storage.
The one place you want the opposite is export. A video file is fixed, so all four are resolved once, at the moment you export, and kept that way forever—switch the shuffles off first if the exported video needs to match what you previewed.
Media Settings: one photo or one video
Sometimes one photo needs different treatment: a group shot worth holding twice as long, or a single image that works better in black and white. Double-click its thumbnail on Mac, or tap it on iPhone and iPad, and you get the same settings again, this time applying to that one item alone.
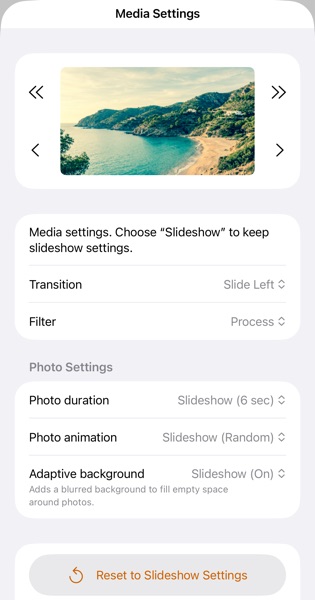
The screen tells you how inheritance works: “Choose ‘Slideshow’ to keep slideshow settings.” Every control starts at a value like Use Slideshow or Slideshow (6 sec), meaning this photo has no opinion of its own and follows the slideshow. Pick anything else and you’ve overridden it for this one item. The parenthesized value is a genuine convenience—you can see what the photo is currently doing without leaving the screen to check the slideshow settings.
For a photo you can override:
- Transition — the transition into this photo. Note that at the slideshow level you pick a set of transitions and SlideFlow varies among them; here you pick exactly one, which is how you pin down a specific effect for a specific moment.
- Filter — a single filter for this photo, or Use Slideshow. The thumbnail above updates as you choose, so you see the filter on this photo rather than on a sample.
- Photo duration, Photo animation, and Adaptive background — the same three settings described above, for this photo only.
Two actions sit at the bottom. Reset to Slideshow Settings clears every override at once and puts the photo back to following the slideshow—much faster than returning five controls to their Slideshow value by hand. Remove from Slideshow takes the photo out of the slideshow altogether; it doesn’t touch the original file or your Photos library.
The arrows around the preview at the top move between media without leaving the screen: the single chevrons step to the previous or next item, and the double chevrons jump to the first or the last one. Handy when you’re going through a slideshow item by item and adjusting as you go.
Videos have fewer settings
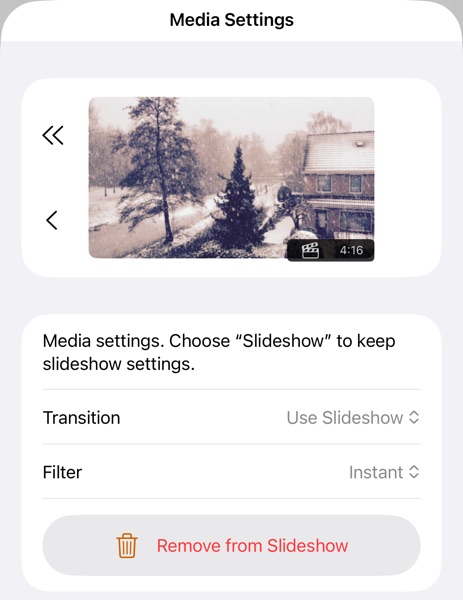
Open the settings for a video and you’ll find Transition, Filter, and Remove from Slideshow. What’s missing is the Photo Settings group, and that’s not an omission—it simply doesn’t apply. A video has its own length (the badge on the preview shows it) and its own motion, so there’s nothing for photo duration or photo animation to do. Adaptive background doesn’t apply either: a video plays as it was shot, on plain black if its shape doesn’t match the frame. Reset to Slideshow Settings is absent for the same reason—with only two settings to change, there’s little to reset.
Transition works on a video exactly as it does on a photo: the clip is eased in from whatever came before it rather than cutting in, and you can pin down one specific effect for one specific clip. SlideFlow transitions to a still of the video’s first frame and starts playing the moment the transition finishes, so the motion begins cleanly rather than halfway through an effect. The full catalog of transitions is the same for both.
Default Slideshow Settings: the starting point for new slideshows
The third level is the one people go hunting for, because it isn’t inside a slideshow. Open SlideFlow’s own settings with the Settings… gear button in the toolbar—on Mac also with ⌘, or SlideFlow → Settings…—then open Default Slideshow Settings at the top. The screen that opens looks almost identical to the slideshow settings and does the same things, but for every slideshow you create from now on.
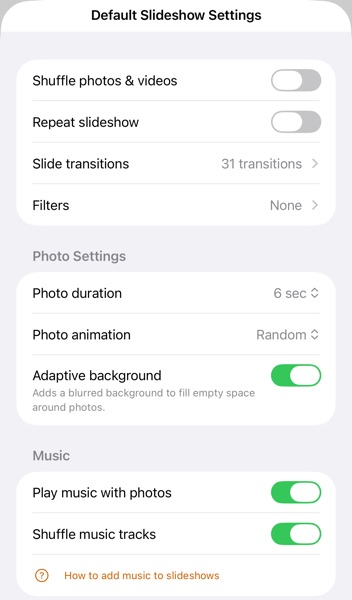
This is where a few minutes pays off repeatedly. If you always speed the pace up to three seconds and always turn shuffle on, set it once here and stop redoing it for every slideshow. Existing slideshows keep their own settings, so there’s no risk of disturbing work you’ve already done.
One thing to know if you work across several devices: these defaults belong to the app on the device you set them on. Your slideshows sync between your Mac, iPhone, and iPad and carry their own settings with them, but the Default Slideshow Settings don’t travel—set them once per device.
The General and Photo Settings sections repeat the slideshow screen almost row for row, in the same order. Three differences are worth pointing out:
- Music gets a section of its own, with a single switch instead of a track list: Play music with photos. Leave it on and each new slideshow gets its own random eight built-in tracks; turn it off and new slideshows start silent, ready for you to add exactly what you want. There’s no default track list on purpose—it would make every slideshow open with the same song. Shuffle music tracks appears underneath the switch when it’s on, and sets the default for new slideshows. This is the one place that default lives: in a slideshow the same toggle sits on the Music Tracks screen, and there is no track list here to put it on.
- There is no Overlays section. A title or logo belongs to a particular slideshow, so overlays are created per slideshow rather than inherited.
- On Mac there’s an extra Playback section at the bottom, described next.
Play full screen (Mac only)
On Mac, the Default Slideshow Settings end with a Playback section holding one switch that has no iPhone or iPad equivalent:
Play full screen decides whether slideshows take over the whole display or play in a resizable window. It’s the odd one out on this screen: not a starting point for new slideshows but an app-wide preference, so it takes effect immediately, for every slideshow you play—including the ones you already made. That’s why it sits apart from the defaults the screen is named after.
Full screen is the right choice for actually watching something. But playing in a window is genuinely useful while you’re still working: you can keep other things on screen, and—because the slideshow adapts to whatever size the window is—you can preview the framing of a vertical or square export by simply reshaping the window. On iPhone and iPad slideshows always play full screen, so the setting doesn’t appear there.
Which level should you use?
A quick rule that covers nearly every case:
- The whole slideshow should change → Slideshow Settings.
- One photo or video is the exception → Media Settings.
- You keep making the same change on every slideshow → Default Slideshow Settings.
And when a change turns out to be a mistake, Reset to Slideshow Settings on the media level puts one item back to following its slideshow, and setting a single control back to Use Slideshow does the same for that one setting.
A few practical tips
- Preview instead of guessing. SlideFlow generates slideshows on the fly, so playback starts almost immediately. Trying a different duration or a different set of transitions costs you seconds—there’s no reason to settle it in the abstract.
- Change one thing at a time. Pace, transitions, filters, and animations all interact. If you change four settings and the result feels off, you won’t know which one did it.
- Fewer transitions usually looks better. Variety is good in a casual family loop; for anything you’re going to share, a small set—or just Cross Dissolve—reads as deliberate rather than busy.
- Set the duration by the content. Detailed photos and landscapes reward a longer duration; quick snapshots don’t. Photos with people in them often want a little more than you’d expect, because the zoom animations need time to travel: the whole point of the move is that the viewer sees both ends of it, the scene and the subject in it, and a short duration rushes the camera through the journey.
- Turn on several filters for a slideshow you’ll loop. Your photos come back in a different style on every pass, without a single duplicate copy in your library.
- Keep adaptive background on if you’ll export vertical or square. It’s the difference between a photo floating on black bars and one that fills the frame.
- Switch shuffle off before exporting. Both for media and music, if you want the exported video to match the version you previewed.
- Decide how it ends before you export. The ending transition is the last three seconds your viewers see, and unlike during looping playback, an exported video always reaches it.
(Note: New to SlideFlow? The step-by-step tutorials for Mac or iPhone and iPad walk you through your first slideshow in a few minutes—then come back here to customize it. More questions are answered in the SlideFlow FAQ).