Once you’ve created your slideshow (on Mac, iPhone or iPad), you can save it as a video file to share, upload, or watch anywhere—in a message to your family or friends, or on YouTube, Instagram, and TikTok.
SlideFlow converts your slideshow into a standard MP4 video file—the most widely supported video format there is, playable on practically any modern device, and accepted by every video site. Exported videos can be copied, backed up, edited in other video editors, uploaded to cloud storage, or played on devices that don’t have SlideFlow installed.
If the destination is simply another of your own devices, though, you may not need an export at all: slideshows already sync between your Macs, iPhones, and iPads over iCloud. Exporting is for everywhere else—other people, other apps, and the web.
You decide how that file is made: the aspect ratio, the resolution, and the video format. This guide explains what each of those choices does, and which one to pick for where your slideshow is going.
In short: saving your slideshow as a video means exporting it, and SlideFlow exports MP4 files encoded with H.264 or HEVC, at 720p, 1080p, or 4K, in horizontal 16:9, vertical 9:16, or square 1:1. If you’d rather not think about it, choose 1080p and H.264, and pick the shape your destination expects: 16:9 for YouTube and TV, 9:16 for Stories, Reels, TikTok, and Shorts, 1:1 for feed posts. The full recommendations per destination are at the end of this guide.
When you need to export a video file (and when you don’t)
It’s worth saying up front that you don’t have to export anything to watch your slideshow. SlideFlow generates slideshows on the fly, so you can play them right away on your Mac, iPhone, or iPad, or cast them to a compatible DLNA TV over your local network— all it takes is a TV on the same network as your device. That’s the fastest way to watch, and it’s how you should preview your work while you’re still adjusting it.
Exporting is for everything that leaves your devices:
- Uploading to YouTube, Instagram, TikTok, Facebook, or Vimeo.
- Sharing the slideshow with people who don’t have SlideFlow.
- Keeping a fixed copy of a slideshow as it looks today.
- Taking it into a video editor for further work.
Playing also keeps two things an exported file can’t give you:
- No huge file to store or send. The longer the slideshow, the larger the video, and it adds up quickly—a hundred photos at 4K turn into a file that’s slow to upload, awkward to store, and too big for most mailboxes. Playing costs nothing beyond the photos you already have, so for a really long slideshow, playing on your device or casting to a TV is usually the better answer.
- Looping. A slideshow can loop endlessly while it plays on your Mac, iPhone, iPad, or TV—which is what you want at a party or a family gathering, where it simply keeps going in the background. Shuffling the music tracks even brings some freshness to each loop iteration. An exported video is a fixed-length file: it ends when it ends, unless the player you hand it to happens to offer a repeat function of its own.
Export has one real advantage in return: exported videos may play more smoothly. Generating a slideshow in real time is demanding work—decoding photos and videos, animating them, and blending transitions, all while you watch—so on a less powerful device, or one that’s busy with something else, playback can occasionally look slightly jerky. An exported video was rendered ahead of time and is just a video file, with nothing left to compute during playback. When you want the smoothest possible result—on an older device, or for a slideshow you’re about to show to an audience—export it and play the file.
Export is also the one moment when SlideFlow renders the whole slideshow rather than generating it as it plays, so it takes some time—longer for higher resolutions and longer slideshows. Preview first, export once.
How to export and share a slideshow as a video
- Open the slideshow you want to export.
- Click or tap the Export button.
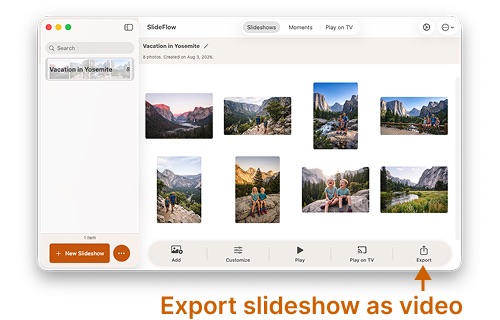
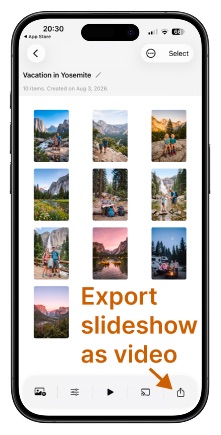
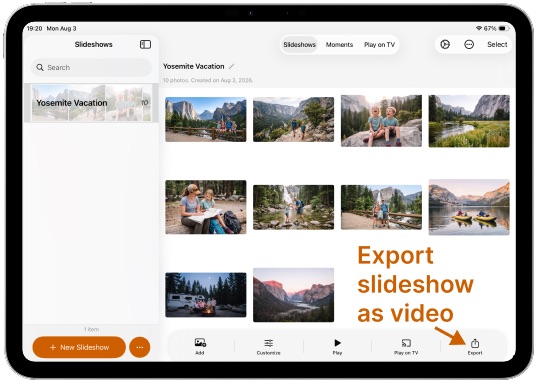
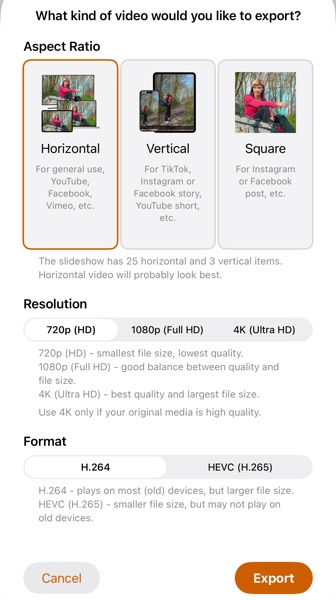
- Choose the aspect ratio, resolution, and video format.
- Start the export and wait while SlideFlow renders the video. The progress screen shows the photo or video being worked on as it goes, a progress bar, and roughly how much time is left—and when it reaches a video in your slideshow, how far through that clip it is.
- When it finishes you get the video itself: a preview you can play, the file’s name and size, and three ways to keep it—Save File, Save to Photos, and Share. Sharing hands the file straight to Messages, Mail, or wherever you publish, which saves finding it on disk afterwards.
Before you save, you can rename the file: click or tap the name to edit it. On Mac and iPad you can also drag the video straight out of SlideFlow into Finder, Mail, or another app.
The steps are the same on Mac, iPhone, and iPad. The interface may look slightly different, because SlideFlow is designed for each platform, but the export options are identical.
Those options in step 3 are the whole of the decision, and the rest of this guide explains them one at a time.
Choose the aspect ratio
The shape of the video matters more than any other setting, because every platform expects a particular one. SlideFlow exports in three aspect ratios:
- Horizontal 16:9 — the classic widescreen shape. Use it for general purposes, YouTube, Facebook, Vimeo, and for watching on a TV or computer.
- Vertical 9:16 — full-screen on a phone held upright. Use it for TikTok, Instagram and Facebook Stories, and YouTube Shorts.
- Square 1:1 — equal width and height, and never cropped by a feed. Use it for Instagram and Facebook posts, and anywhere a feed shows a square thumbnail.
SlideFlow makes a suggestion before you choose. It counts the photos and videos in the slideshow and tells you what it found—“The slideshow has 32 horizontal and 4 vertical items. Horizontal video will probably look best.”—then pre-selects the shape matching the majority. Treat it as a starting point rather than a decision: when the video is headed somewhere with its own expectations, pick that shape instead and let SlideFlow fit the photos to it.
Your photos, of course, aren’t all the same shape, and some of them won’t match the frame you picked. SlideFlow handles that for you: whichever aspect ratio you choose, the slideshow content is optimized to fit the frame in the best possible way, so you don’t have to crop anything by hand or accept black bars on all four sides.
The image below shows how SlideFlow fits a full horizontal photo in three different aspect ratios: horizontal, vertical, and square. The slideshow setting Adaptive background is enabled to add a blurred background filling the empty space around the photo. Without this setting, the frames would show black borders instead.

In a traditional video editor you would do all of this by hand, photo by photo: fit each one into the frame, generate a blurred background so it doesn’t sit on black borders, and define its animation. SlideFlow does it for you, automatically!
You can export the same slideshow as many times as you like. A horizontal version for YouTube and a vertical one for Stories are two exports of the same slideshow, with no re-editing in between.
Choose the resolution
The resolution decides how detailed the video is—and how large the file gets. SlideFlow offers three:
- 720p (HD) — the smallest files. Good for quick sharing over messaging apps and email, or when the recipient will watch on a phone.
- 1080p (Full HD) — the sensible default. Sharp on phones, tablets, and most TVs, at a file size that still uploads comfortably.
- 4K (Ultra HD) — the most detail, and by far the largest files. Worth it when the slideshow will be shown on a large 4K TV or monitor, and when you have the time and disk space to spare.
If you’re unsure, choose 1080p. It’s what most people watch on, and every platform accepts it. Going to 4K doesn’t improve anything if the video ends up playing in a small window in a social feed—it only makes the file bigger and the export slower.
Choose the video format: H.264 or HEVC
Finally, you can choose how the video inside the MP4 file is encoded. Both options produce an ordinary MP4 file that any player will recognize—what changes is the codec used inside it:
- H.264 — the most compatible option. Practically everything can play it, from old phones to smart TVs to every video site. The trade-off is a larger file for the same quality.
- HEVC (H.265) — a newer, more efficient format. Noticeably smaller files at comparable quality, but older devices and some software may not be able to play it.
The rule of thumb: if you know where the video is going and the destination is modern, HEVC saves you space and upload time. If you’re sending the file to someone and you don’t know what they’ll open it with, choose H.264—a video that plays everywhere is worth a few extra megabytes.
How large the file will be, before you commit
Underneath the three choices, SlideFlow shows what they add up to: Estimated video: ~4 min long, ~250 MByte file. It is labelled a rough estimate on purpose—the real size depends on the content, and a slideshow of finely detailed photos compresses differently from one of plain ones—but it is enough to tell a comfortable file from an awkward one before you spend the render time. Change the resolution or the format and the estimate moves with it, which makes it the quickest way to see what 4K or HEVC actually costs you on this particular slideshow.
Two warnings can appear alongside it. If the estimate is larger than the free space on your device, SlideFlow says so plainly and suggests reducing the resolution. And for anything above roughly 5 GB it asks you to confirm before starting, because sharing a file that size can temporarily need twice the space again while the copy is made.
Your resolution and format are remembered for next time, so once you have settled on 1080p and H.264 you are not re-picking them on every export. The aspect ratio is not remembered—it is suggested afresh for each slideshow, from that slideshow’s own photos.
What’s included when you export your slideshow
Everything you see and hear when you play the slideshow goes into the file:
- Your photos and videos, in the order the slideshow uses.
- Transitions, animations—including the smart zooms on faces and subjects—and any creative filters you applied.
- Text and image overlays, such as a title for the occasion or your own logo.
- The music. Built-in tracks and your own music are both included automatically, along with the sound from any videos in the slideshow.
- The ending transition, which takes the last frame down to black and fades the music out with it. Playback skips it when Repeat slideshow is on, but an exported file always ends, so it is always in the video.
If you added some files to the slideshow as references—kept in place rather than copied into SlideFlow—they have to be reachable when you export: connect the external drive they live on before you start. Anything out of reach is marked in the slideshow with an orange badge, and its Locate button lets you re-link the files first.
One thing to know before you upload: SlideFlow’s unlimited free trial mode adds self-promotions to generated slideshows, and those appear in exported videos too. Full access through a subscription or the one-time lifetime purchase removes them. You can check the current pricing on the App Store.
Also keep in mind that shuffle settings are resolved at the moment you export. If your slideshow shuffles its photos or its music tracks, the exported video captures one particular run of it—the version your viewers get, rather than the one that varies on every play. The same applies to filters: if you enabled several of them, the exported file keeps the one arrangement it was rendered with.
Give your exported video a recognizable thumbnail
There’s one detail SlideFlow takes care of for you, and it’s worth knowing because it only shows up after the export—in the list of files.
When you watch a slideshow, the first photo or video has nothing to transition from, so SlideFlow transitions it in from a black frame. On screen, that’s exactly right: the show opens out of darkness the way a film does. But Photos, Finder, and most players build their thumbnail from the first frame of a video, or one very close to it—and the first frame of a video that faded in from black would be black: a dark rectangle that tells nobody what’s inside.
So exported videos skip that opening transition. The file starts directly on your first photo or video, fully visible from the very first frame, and that’s what players will most likely show as the thumbnail. There is nothing to set up: playing on your screen or TV keeps its fade from black, and the exported file gets a recognizable face. If you care which picture that is, put it first in the slideshow—the first item is the tile the file will be known by wherever you upload, send, or keep it.
Preview before you export
Playback starts almost immediately, so trying a different transition, a different music track, or a different aspect ratio costs you seconds. Rendering a 4K video only to discover you wanted something else costs a great deal more.
Most of what matters—the music, the pace, the order of the photos—you can judge from any playback. The one thing you can’t is the framing in the ratio you’ll actually publish in: a slideshow built with widescreen in mind can look quite different once it’s fitted to vertical or square, and that’s far easier to notice while you’re still editing than after you’ve uploaded.
On Mac you can preview in a window shaped like your export. In Default Slideshow Settings, tell SlideFlow to play in a window instead of full screen, then resize that window however you like—tall and narrow for a vertical export, square for a square one. The slideshow adapts to the new size right away, which is the closest you can get to seeing the final framing without rendering anything. On iPhone and iPad the slideshow always plays full screen, but rotating the device still lets you compare horizontal against vertical.
Give the picture a moment after you resize or rotate. During real-time playback SlideFlow renders slightly ahead of what you see—that’s what keeps playback smooth—and that buffer has to be rebuilt for the new shape. Expect a couple of seconds before the slideshow settles into the new frame.
One last thing before you commit to a render: switch shuffling off, for both media and music, if you want the preview to match the file you’re about to export. Otherwise you are previewing one random order and exporting another.
Best export settings for sharing, YouTube, Instagram, TikTok, and TV
- Sharing with family and friends — 720p or 1080p, H.264, to keep the file small and playable on whatever device they have.
- YouTube or Vimeo — Horizontal 16:9, 1080p, H.264. Use 4K only if the source photos and videos justify it, and if you expect your audience to watch on large screens rather than phones.
- TikTok, Instagram or Facebook Stories, YouTube Shorts — Vertical 9:16, 1080p.
- Instagram or Facebook post — Square 1:1, 1080p.
- Playing on a big TV — Horizontal 16:9, 4K if the TV supports it.
- Archiving or further editing — the highest resolution you can, with H.264 if the editor you use is picky about formats.
(Note: New to SlideFlow? The step-by-step tutorials for Mac or iPhone and iPad walk you through your first slideshow in a few minutes—then come back here to export it as a video. More questions are answered in the SlideFlow FAQ).