Photo editing software is essential for building a great photo collection. Both if you prefer the most natural look, and play with creative styles. Below we discuss why you want to edit photos, e.g. on Mac. And how Photo Sense, a photo editing app for Mac, helps to achieve your creative vision.
Why do you want to edit photos?
Images rarely come exactly the way you want straight out of the camera. However good it is. Even if all you want is the most natural look. The main reason behind it is that camera sensors are not the same as our eyes.
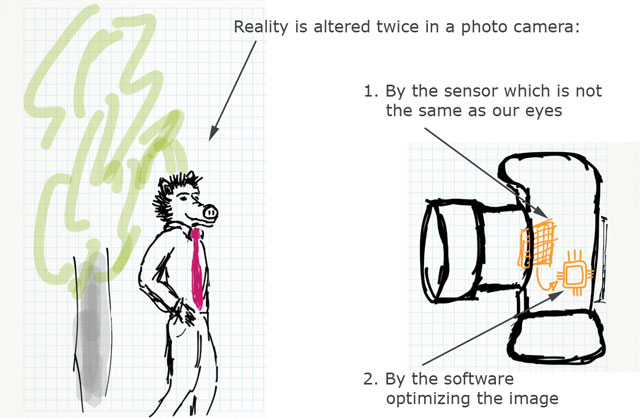
Human eyes, in combination with the brain, are much more advanced than camera sensors and processors. Even the best ones. We know what we are looking at, and under what conditions. Compared to camera sensors, our eyes adapt faster and better to changing light, compensate for color shifts, perceive a much larger dynamic range, etc. Camera sensors do their best to perform similarly, but they cannot compete with nature (yet)…
Moreover, unless you shoot RAW, what the camera delivers is not even what the sensor sees. The camera software processes the sensor data automatically, and delivers JPEGs with a very limited amount of visual information. A lot of the sensor data is lost. This is one of the main reasons why they recommend shooting in the RAW format. With RAW images you get all the sensor data as is (more or less), and then process it in software to create the photograph you like.
Some people think that photo editing software alters reality, because it changes the “truth” recorded by the camera. But can we speak about the “true” photograph coming from a camera as a JPEG image? Definitely not! The “truth” has been altered twice in this image. First, it was perceived by the sensor in its own way, different from our eyes. And second, it was optimized by the in-camera software.
Thus, photo editing in software is usually necessary even just to correct the camera’s mistakes and get realistic pictures! It is not only for making photos more vivid and creative.
Image editing on Mac with Photo Sense
For the reasons described above, after choosing the best photos on Mac, you will probably want to edit some of them. Run Photo Sense and select the source on the left panel. For example, select an album in your Apple Photos Library, or a folder. The photos are shown in Browser, you can now select and edit them.
Photo Sense offers multiple image editing tools. You can use them individually or in any combination. Below we introduce them, in the order convenient for your workflow.
Fix orientation
Some photos may have a wrong orientation, e.g. rotated 90 degrees. Happens with old cameras, and even with modern cameras when their shooting position is unclear.
To fix orientation, select one or more photos. Open the context menu by holding the Control keyboard key and clicking any of the selected images. Click “Transform” → “Rotate …” (Left or Right) in the context menu. Alternatively, you can do it with the Batch Editor, or using keyboard shortcuts.
Crop and straighten
Composition is what makes or breaks a photograph. You may want to crop or straighten some photos to improve their composition.
The Crop & Straighten tool works with only one image at a time, because it provides a fine-grain control. Select a photo and click the “Crop & Straighten” button on the right side of the app toolbar. Alternatively, press “C” on the keyboard. Photo Sense shows the image, and the right panel with the tool’s settings.
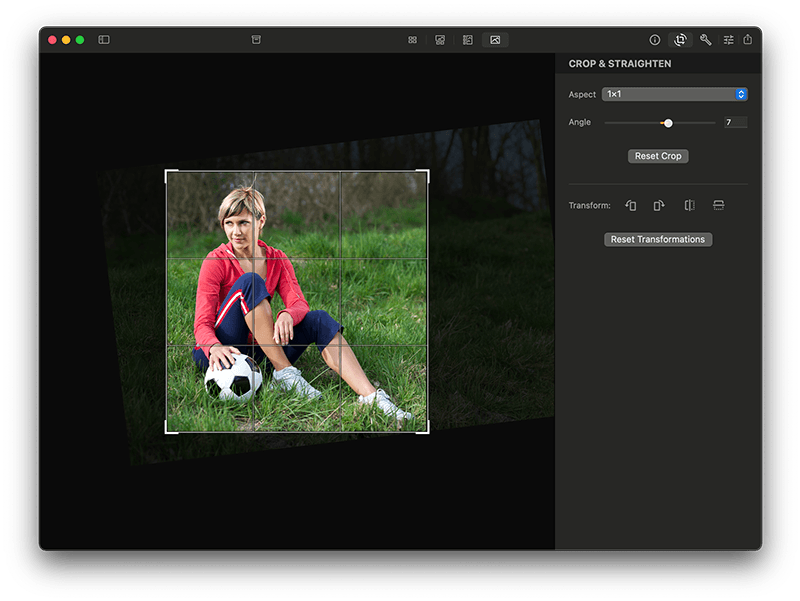
You can define the aspect ratio on the right panel. And straighten the image using the slider, or by dragging the photo outside of the crop rectangle.
Crop the photo by dragging the crop rectangle’s sides or corners. You can also drag the photo within the crop rectangle.
Enhance automatically
After the orientation and composition are settled, it is time to correct and perhaps enhance the photo’s look. You can dive directly to the fine-grain adjustments in the Photo Editor. But it may be worth trying the automatic enhancement and coarse-grain batch adjustments to speed up your workflow. Let’s look at the automatic-first workflow that can save you a lot of time.
Start by enhancing one or more photos automatically. Select them and open the context menu by holding the Control key and clicking any image. Click “Auto Adjust” in the context menu. Alternatively, you can do it in the Batch Editor, or the Editor.
Photo Sense analyzes all the selected photos using its unique algorithms, and enhances them automatically. Does its best to correct lighting, improve exposure, and enhance details. The adjusted photos are shown immediately in Browser.

Sometimes this is all you need. In that case, skip the manual editing sections below and save or export results immediately. In other cases you will want to make some manual corrections.
Edit multiple photos on Mac (batch adjustment)
Batch Photo Editor allows you to apply coarse-grain adjustments to one or more pictures at a time. This is convenient if you have a number of photos with a similar issue: select and correct them all at once. For example, increase exposure to make them brighter.
Select images in Browser, and click the “Batch Editor” button on the right side of the app toolbar. Alternatively, press Command + Shift + E on the keyboard. Photo Sense shows the right panel with the Batch Editor’s controls.
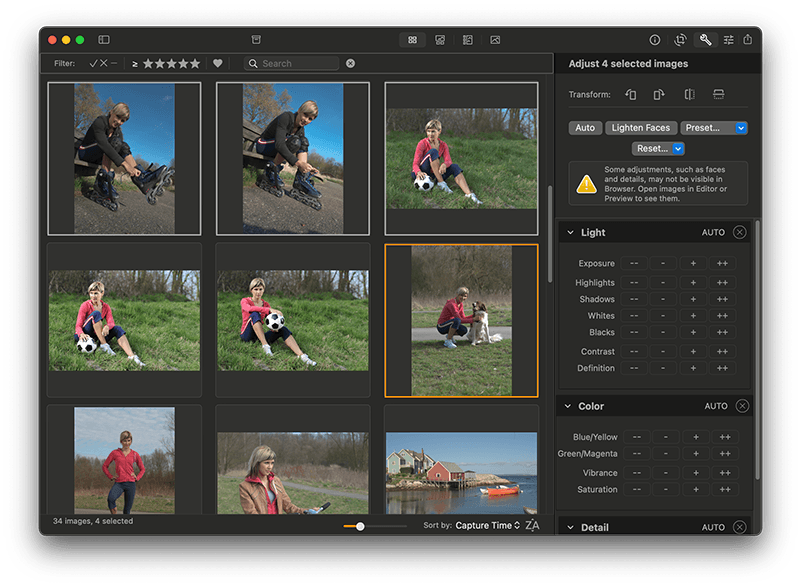
Batch Editor adjustments are applied to all the photos selected in Browser, unless the Preview is also shown. If Preview is shown, Batch Editor adjustments are applied only to the single (active) image highlighted with the orange box.
Photo Sense groups adjustments into light, color, and detail. Batch Editor can apply automatic enhancement settings to any of these groups, reset all group’s adjustments, and change individual adjustments. You can apply adjustments by clicking their buttons “–”, “-”, “+”, and “++”. For example, increasing exposure with the “+” button makes images a bit brighter. And increasing exposure with “++” makes all images significantly brighter. Clicking “-” and “–” for exposure makes images slightly and significantly darker.
Batch Editor also includes controls to enhance photos fully automatically, lighten faces, apply presets, and reset various image settings.
Edit photos on Mac with the maximum control
If you want the greatest control over the image look, take advantage of the Photo Editor. It works with only one image at a time, because it provides a fine-grain control. Select an image and click the “Editor” button on the right side of the app toolbar. Alternatively, press Return, E, or D on the keyboard. Photo Sense shows the image, and the right panel with the Editor’s controls.
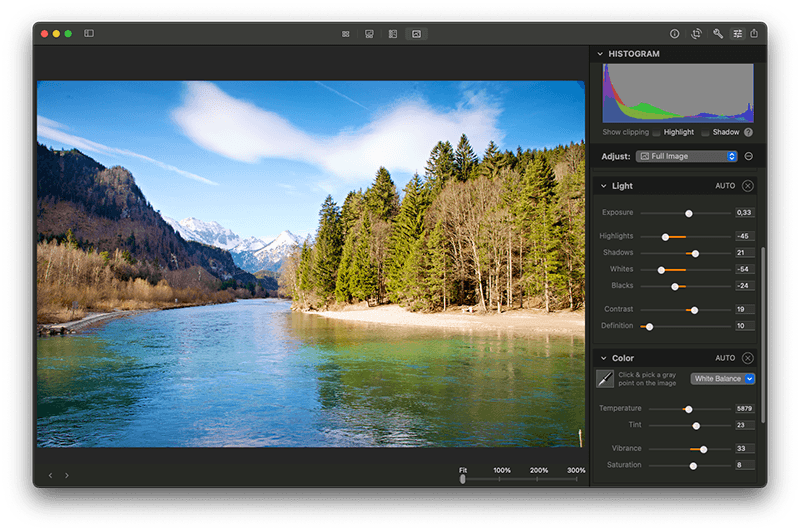
Photo Sense groups adjustments into light, color, and detail. When editing RAW photos, it also adds a “RAW Fine Tuning” group with some additional RAW processing controls. You can apply automatic enhancement settings to any of these groups, reset all its adjustments, and change individual ones with high-precision sliders and other controls.
Editor also includes controls to enhance photos fully automatically, lighten faces, create and apply presets, and reset various image settings.
Adjust human faces
We believe that if a photo has faces, they are likely the most important part. And we developed unique tools to easily adjust faces. Individual or all at once, without the tedious manual brushing!
There is a popup control defining what is being adjusted under the histogram. It always includes the “Full Image” option. When selected, the controls below adjust the whole image. When some human faces are detected, they are added to this popup. With multiple faces it also shows “All Faces”.
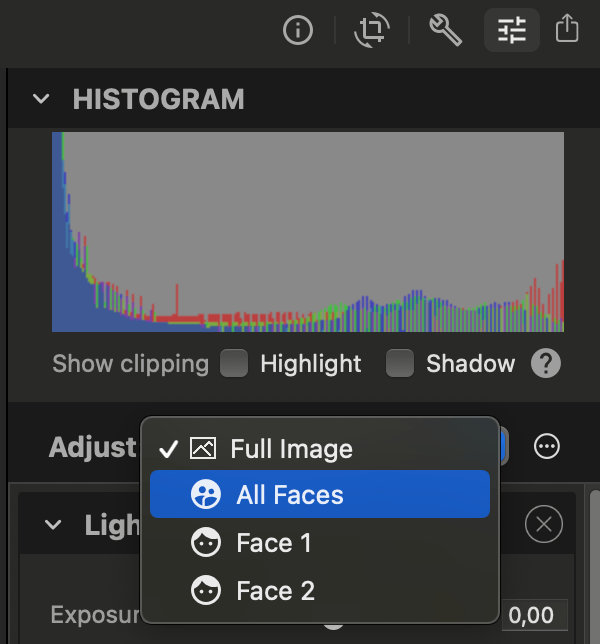
Select either a specific face to adjust it, or “All Faces” to adjust all the detected faces at once. Use the sliders below to achieve the desired look. It often helps to make faces brighter, sharper, add contrast, reduce noise, etc. For example, to make all faces brighter, select “All Faces” and increase their exposure, or bring up shadows.
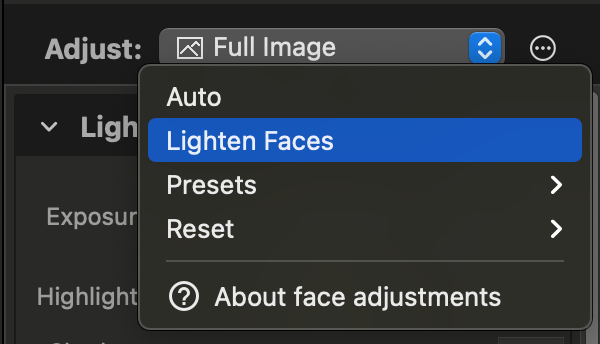
You can also lighten all faces with a single command. Click the action button to the right of the “Adjust” popup, and choose “Lighten Faces”. This command is also available in other places, e.g. in the Batch Editor and in the Browser’s context menu.
Evaluate the image exposure
You can find the image histogram and clipping overlay controls on the top in Photo Editor. They help you evaluate the image exposure. Find out if it has some lost detail in the very bright or very dark areas.

Enable the “Highlight” clipping overlay to visualize very bright image areas that may have lost detail. They will be painted in red. If you have many of these, you may want to bring down exposure, highlights, or whites.
If you are editing a RAW image, we highly recommend giving some extra attention to our unique “Whites” tool. Bringing whites down is likely to recover some lost detail in highlights, which is normally out of the available color range and thus invisible.
Enable the “Shadow” clipping overlay to visualize very dark image areas that may have lost detail. They will be painted in blue. If you have many of these, you may want to bring up exposure, shadows, or blacks. It may also help to reduce contrast.
Copy settings between images
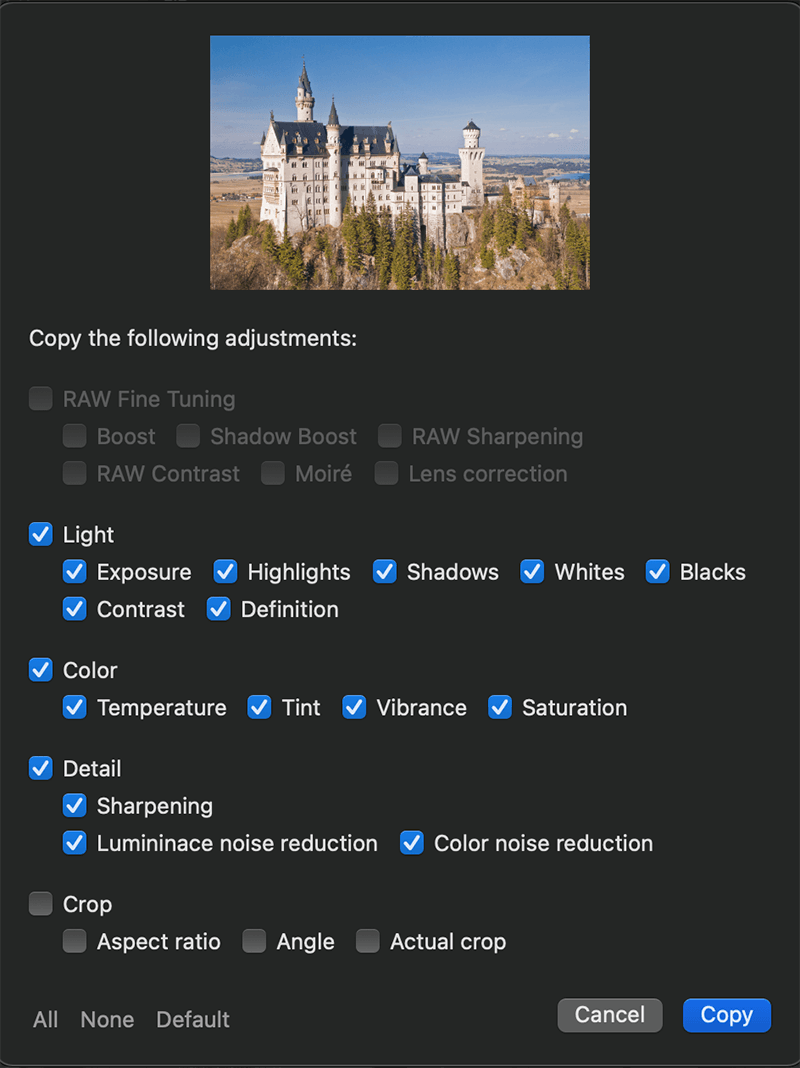
You have edited a photo to perfection. You may have some other photos shot with similar lighting conditions. Instead of starting from scratch with every one, you can just copy your adjustments and save a lot of time!
Copy adjustments from the finished photo using the menu Image → Copy Adjustments…, or the keyboard shortcut Command + Shift + C. Select all or specific adjustments you want to copy.
Now open another image and paste adjustments using the menu Image → Paste Adjustments, or the keyboard shortcut Command + Shift + V. To paste the same adjustments on multiple photos, go to Browser, select all the target photos, and paste in the same way.
You can also use the command Image → Paste Adjustments From Previous (or Command + Option + V) to avoid copying. It copies all adjustments from the previous image shown in Browser. This is convenient, for example, if you have already moved to the next image in Editor or Preview.
All the copy & paste adjustments commands are also available in context menus in Browser and Preview.
Create and use presets
If you often apply similar adjustments, it may be useful to save them as a preset. Presets are available at any time, even after relaunching Photo Sense.
To create a preset, first edit a photo with settings you want to save. Then create a preset, e.g. using the context menu in Browser or Preview. Open the context menu by holding the Control key and clicking the edited image. Choose Presets → Create a New Preset… You can also create presets from the Image menu, or the “action” menu in Editor.
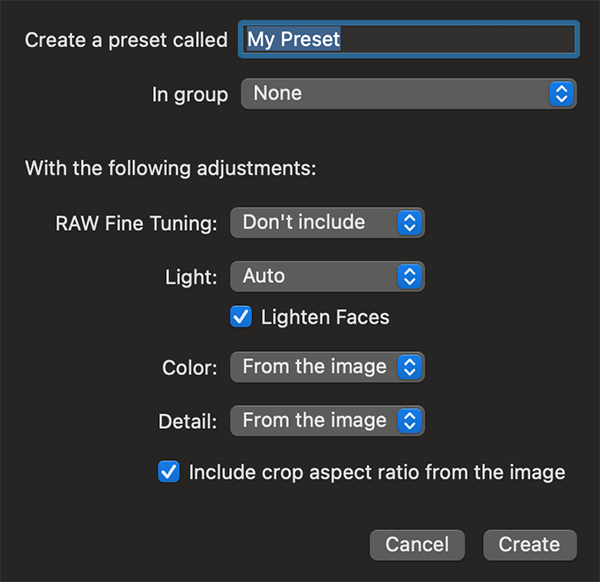
Photo Sense offers you a choice of adjustments to include in the new preset. For every group, you can include adjustments from the image, use auto enhancement settings, or exclude it. In addition, you can enable “Lighten Faces” and include the crop aspect ratio from the image. For convenience, presets can be named and grouped.
After creating some presets, you can apply them to one or more images. Only the settings defined in the preset are applied, the others are kept intact.
This enables you to quickly apply frequently used adjustments. For example, you can create presets for certain types of images, or with certain styles.
Save results
Finally you are finished editing all the photos. Or only some of them. Or perhaps finished the first round, and want to revisit them later again. Anyway, you have done some work, and we highly recommend saving the results.
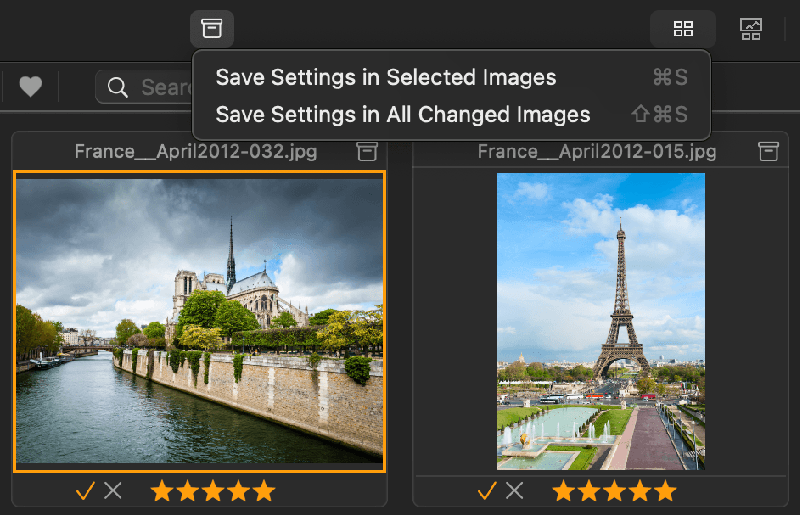
Photo Sense doesn’t save your changes automatically, because it may take a long time for many photos, and may slow down your workflow. Instead, Photo Sense lets you decide when and what to save.
Use the toolbar, app menu, or context menu to save changes in the selected or all changed images. Your edits are saved non-destructively, as metadata, without changing the original image pixels.
After the results are saved, you can quit Photo Sense without losing your work. When you open the same photos in Photo Sense again, it restores all your edits and applies them to the original photos. You can adjust anything again.
Saving works differently with image files and Library photos. For image files, Photo Sense only adds metadata describing its adjustments and other changes. Thus, if you open these files in other apps, they will show the original images without adjustments. To see edited images, open them in Photo Sense again.
When saving Library images, Photo Sense also generates the final (edited) version visible in the Apple Photos app. It even syncs with your other devices connected to the iCloud Photo Library. Thus, you can view final photos on another Mac, iPhone, or iPad. You can also edit photos on one Mac, and continue editing them in Photo Sense on another one!
Export photo editing results
If you want to see your final edited photos in other apps, export them instead of saving. Click the “Export & Share” button on the right side of the app toolbar, or press “S” on the keyboard. Photo Sense shows the right panel with the export settings.
Optionally add some export actions, such as resizing, renaming, changing metadata and defining format. Then export to generate final images.