Aperture, shutter speed and exposure
Photography is all about light. To let the camera “see” what you wish, you have tools controlling how much light reaches the camera sensor: the aperture and shutter speed controls. With too little light, your photo will be too dark. With too much light, it will be too bright. In both cases some details will be lost. You use aperture and shutter speed to achieve the proper exposure, while taking into account some important side-effects you should be aware about.
Imagine that you are looking through a small round hole in a fence. How much of the scene behind the fence will you see and comprehend? I would say it depends on two factors:
- How large the hole is. The larger it is, the more you will see.
- How long you look. The longer you look, the more details you will notice.
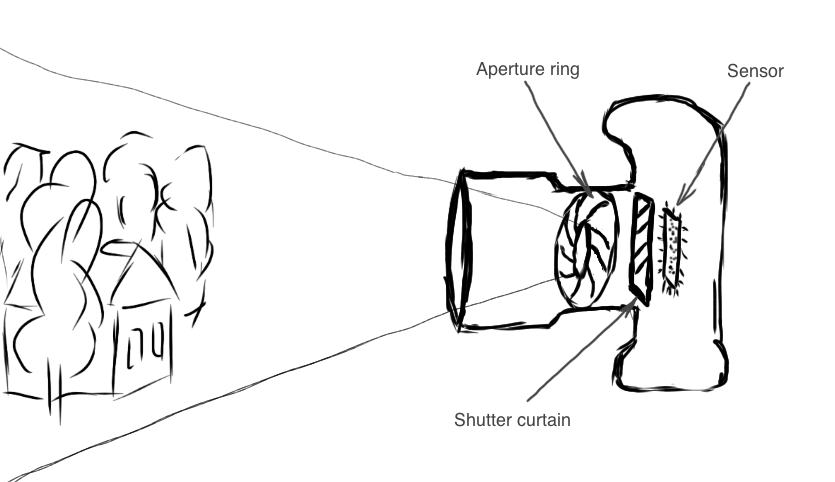
Same story happens in a photo camera. I am now probably risking to get a negative evaluation of my physics knowledge, which would unfortunately be quite fair… However, although the physical reasons might differ, the conceptual comparison seems to be quite adequate. When shooting with a photo camera, you let the sensor see the scene through a hole in the lens called aperture. The larger this hole is, the more light reaches the sensor. Normally the sensor is closed by a curtain called shutter. When shooting, the shutter opens, light reaches the sensor through the aperture hole, and then it closes again. The longer the opening lasts, the more light reaches the sensor. This time is called shutter speed.
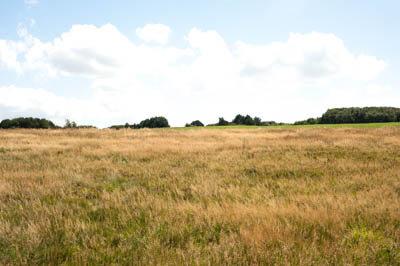
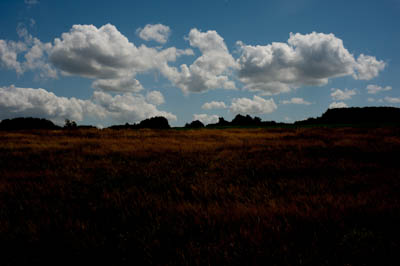
When shooting, your goal is to expose the right amount of light to the camera sensor (that’s why it is called exposure). If you provide insufficient amount of light, the photo will be too dark. If you expose too much light, the photo will be too bright. The larger the deviation from the normal exposure is, the more chance you have to hopelessly lose image data. Software post-processing can fix the perceived exposure (for example make a dark photo look brighter), but it cannot re-create the image data lost while shooting. For example, a very common landscape photography problem is loosing clouds in a bright sky. When it is overexposed (too much light reaches the sensor), the whole sky becomes completely white, and the clouds cannot be distinguished any more. On the other hand, with underexposure (too little light reaches the sensor), shadowed parts of the image lose details, become completely black. Software cannot rescue such details, because they do not exist in the original image.
Thus, it is very important to get the exposure right when shooting. But what is “right”? Does it mean “the photo must look so bright/dark as I want it to be on the final photograph”? No! By “right” I mean that the exposure must be such that the maximum number of the scene details is captured by the sensor. Recording the visual information, as much as possible – that’s what the camera is for! Then you present these data in the way you like, create the final photograph in Photo Sense (see also why software post-processing is necessary). In fact, the best properly exposed photos often look terribly dull before software post-processing.
Fortunately modern photo cameras often provide accurate automatic exposure evaluation. At least with a natural, more or less even lighting, their evaluation is usually great. In automatic mode, the camera suggests the aperture and shutter speed values to use. They guarantee a good exposure. But are these really the best possible values? Why not to enlarge the aperture hole twice and halve the shutter speed? The amount of light reaching the sensor will be the same, thus it does not make any difference, does it? Well, in fact it does. Although the exposure is still the same (and correct), this change can make a great difference in the resulting photograph. Both aperture and shutter speed affect more aspects than just how much light reaches the sensor, and a photographer must always keep them in mind to get good results. However good your camera is, it is still unable to read your mind, and thus to know what exactly you want. Let’s look at the aperture and shutter speed in more detail, and discuss their important side effects.
Aperture and depth of field
As explained above, aperture defines how large the hole is through which the sensor sees the world. In photography, aperture is measured in units called F-numbers, F-stops or whatever else with this F-. Without going into details about what exactly this F- is (I would need to look it up myself to explain, physics again), all you really need to know is the following. The smaller the F-number is, the larger the aperture hole is, and the more light reaches the sensor. From now on by “large aperture” I will mean a large aperture hole (and a small F-number), and vice versa by “small aperture”.
In practice, depending on the lens you have, you usually use F- values from about F4 (large aperture) to approximately F16 (small aperture). Some quality lenses support much larger apertures, for example my favorite Nikon lenses (85mm and 50mm) get to F1.8 or even F1.4. These are very light-sensitive lenses saving you in dark conditions (more about low-light photography).
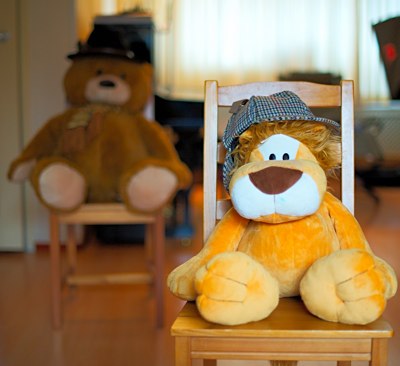
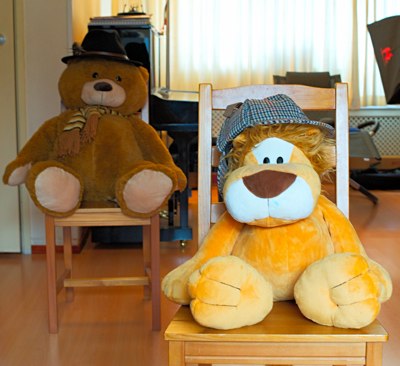
In addition to the amount of light reaching the sensor, aperture affects another very important aspect: the depth of field. Imagine several objects located at different distances from the camera. Say a person 5 meters away, a bear 7 meters away, and a tree 10 meters away. The camera sees them all, but the question is: which objects are in focus? The larger the depth of field is, the more objects are in focus. And the smaller the aperture (the larger the F-number) is, the larger the depth of field is. Thus, to get only the person in focus (with the bear and tree out of focus), focus on the person and set the maximum aperture, such as F1.8. This is great for portraits with nice blurred backgrounds. To capture the whole scene, you also want the bear and tree in focus – use a greater F-number, such as F8 or more.
Note that aperture is not the only parameter affecting the depth of field. For example, the distance between the photographer and the subjects also plays a very important role. The closer you are to the first subject, the smaller depth of field becomes.
Shutter speed
Shutter speed is the time while the shutter curtain is open, exposing the sensor to light. Don’t worry, there are no frightening F-numbers here :-). Shutter speed is measured in normal seconds. At bright day light, we usually use hundredths of a second. When cloudy, in shade etc., might be tenths of a second. At night it comes to full seconds.
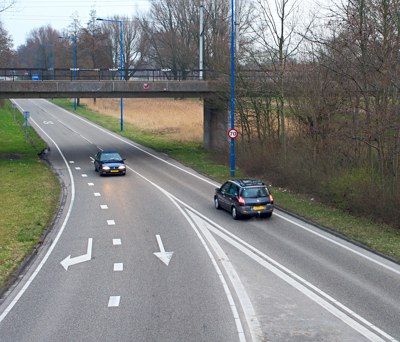
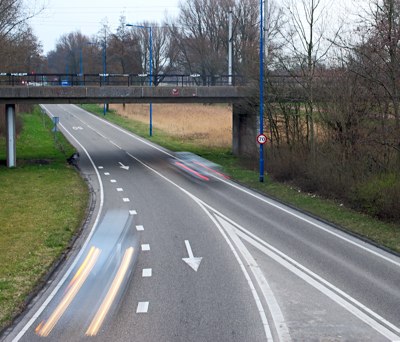
While the shutter is open, the sensor records everything it sees. It does not realize what the objects are, it just divides the scene into millions of dots and records the color of every dot during the exposure time. Imagine that it is quite dark, and we are shooting a moving car at the shutter speed of 1 second. With the speed of only 50 km per hour, the car will move by almost 14 meters during this time. The sensor will see the car at the initial position at the first moment. Then the car will move to a place where the sensor previously saw only the background, and the sensor will now see only the background at the car’s initial position. And so on until the final car position. What will be on the resulting photo? A 14-meters long semi-transparent car! :-)
The car we obtained is not sharp, it has what is called motion blur. The motion blur is the result of shooting moving objects with long shutter speeds. This is the shutter speed side-effect you should always keep in mind. If you want to get a sharp object, make sure the shutter speed is fast enough to freeze its motion. If you want to get a motion-blurred object to emphasize the movement, make sure the shutter speed is slow enough.
ISO speed (sensitivity)
When you cannot get the right exposure with the aperture and shutter speed, it is time to think about the ISO sensitivity (also called ISO speed). It defines how sensitive the camera sensor is to light. With the same amount of available light, the higher the ISO sensitivity is, the more light will be captured by the sensor.
The ISO sensitivity is measured in… numbers! :-) I do not know what exactly these numbers mean, never needed it (now, when writing this, I became curious :-) ). The “normal” ISO speed depends on your camera. In my experience it is either ISO 100 or ISO 200. This is what you start with. If you cannot get the right exposure by altering aperture and shutter speed, try to adjust the ISO speed. I cannot remember a situation when I needed to reduce the normal ISO speed. Aperture and shutter speed can reduce the amount of light as much as needed in most cases, with rare exceptions. There are also other ways to reduce the amount of light, such as lens filters. The ISO sensitivity control is usually useful with insufficient light. When ISO 100 is not enough, try ISO 200, ISO 400, etc.
This is not so simple, however. Aperture and shutter speed controls can be considered safe, because they alter a natural measure: the amount of light. The ISO sensitivity is more artificial, its increase comes at a price. The more sensitive the sensor becomes, the more image noise it creates. This is when the equipment quality becomes important in photography: expensive professional cameras usually allow much higher ISO speeds before the image noise becomes prohibitive. With my entry-level DSLR Nikon D80 I never shot above ISO 800. With Nikon D700 I often get to ISO 1600 (twice more sensitive) and sometimes even to ISO 3200.
Find the right balance!
You, as a photographer, decide the right exposure configuration. Modern cameras in automatic mode provide you with a (usually good) proposal: an aperture and shutter speed combination achieving the right exposure. Depending on your goals, you evaluate this combination. Does it achieve the desired depth of field? Is the shutter speed fast enough to avoid motion blur, or slow enough to make it? Make adjustments if necessary. For example, to increase the depth of field, reduce the aperture and increase the shutter speed (or ISO sensitivity). See more advices and examples in the basic photo shooting guide.
Photography software we recommend
As you are interested in photography, you may like the following software: