This article discusses flash photography, a topic which seems to be easy and straightforward, but, in my opinion, is not. Beginning photographers usually think they know what camera flash is for: to generate artificial light when the ambient light is not sufficient. This is certainly true, but you need to develop certain skills to make sure that camera flash produces nice natural-looking lighting, does not spoil your photos. Moreover, you should realize that camera flash is useful far not only for low light photography. In fact, I probably use it more often in a bright sunshine than in low light situations…
My first flash photography advice is to switch off the automatic flash, when the camera decides if the built-in flash should be used. Whatever kind of flash photography you are doing, the automatic camera flash has a good chance to be useless at best. In low light, the automatic flash will only be useful occasionally (more on this below). In harsh light when you want a fill flash, it will never work. In some cameras you might need to disable the automatic flash in menus. On entry-level Nikon DSLRs (at least those I know), it is enough to switch the exposure mode dial from the automatic mode (the green Auto) to the P mode, or any other real mode: aperture priority A, shutter priority S, or manual M. On professional-level Nikon DSLRs you are save, because there is no Auto mode at all :-)
Low light flash photography
As already mentioned, I strongly recommend to disable the automatic camera flash. Only use flash when you explicitly want it, never leave up to the camera to decide! The camera’s decision is based on the light sensor, which activates when it seems to be dark. But dark conditions are far not a sufficient reason, and not the only reason, to use flash!
The camera flash has a very limited reach, if I remember correctly, built-in flashes only cover around 4 meters! The external DSLR flashes are usually much more powerful, but they are still not going to light up the whole landscape! Thus, in dark conditions, camera flash is only useful to light up a relatively small subject, which is sufficiently close to the camera. It is so ridiculous to see somebody with a good expensive DSLR shooting landscape with a flash… I feel so sorry for them for wasting money on a good camera…
Moreover, it might be dangerous, you might miss the shot! When the flash fires, the camera automatic exposure settings might be configured with the assumption that the subject will be lit by the flash, and the photo will be just too dark!
So, when to use camera flash in dark conditions? Technically it only makes sense when you wish to light up a relatively small subject, such as a person, at a close distance within the flash’s reach. However, there are also aesthetic traps. If you put the subject too close to the camera, it will likely be completely white and ugly. And even at a good distance, if you want beautiful photos, you should avoid what is called a direct flash.
Direct flash means that photos look like… like they are lit with a direct flash. :-) Photography is all about light, remember? How light interacts with the subject, how it paints parts of the subject, leaving other parts in shadow. With an on-camera flash pointed directly to the subject, you let it light exactly those parts the camera sees. As a result, the camera sees (almost) no shadows, just a plainly lit subject, which appears completely flat, featureless, emotionless. Flat reflective surfaces are likely to reflect the flash light, making it too obvious. Moreover, a flash light is a small light source, which means it produces harsh shadows. If the subject is close to a background (such as a wall), you might see harsh shadows on the background behind the subject. If you are making a portrait, all skin imperfections will be exaggerated, which may lead to a serious dispute with your girlfriend. :-)
Unfortunately, there is not much you can do if you only have a built-in camera flash. Only maybe fire the flash thorough a sheet of paper to enlarge the light source, but it is not a great deal. That’s why I recommend to use a built-in camera flash in dark conditions only as the last resort, if you completely miss the shot otherwise. Myself, I do use it sometimes, but only as a fill flash at a strong sunshine, never in dark conditions.
In dark conditions, you want a powerful external flash unit, such as the Nikon Speedlight SB-700 or even more powerful and functional SB-910. If you have time and space, would be nice to have two or three such units to arrange a mini photo studio. :-) But I will now assume that you have only one, attached to the camera.
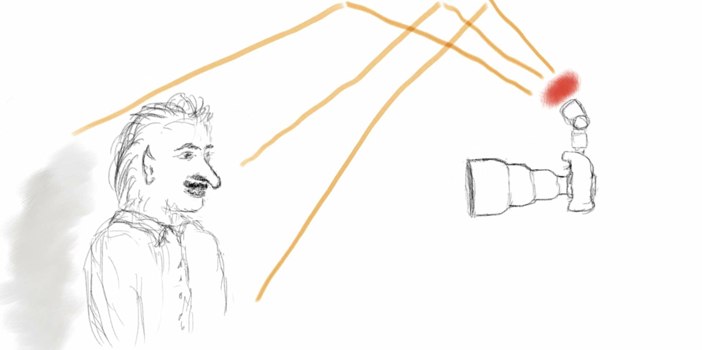
Obviously, if you point this flash directly towards the subject, you will get just the same flat lighting (direct flash) as with the built-in camera flash. Thus, you better point it to something else, which is usually the ceiling or the walls. The idea is that the flash light bounces from the ceiling or wall and lights up the subject. But now from some angle, not directly from the camera, and thus you will have much more interesting subject illumination. Moreover, the light source becomes larger when bounced from a ceiling or wall, producing softer illumination. For this technique to work, it is of course important that the bouncing surface (ceiling or wall) is quite close to you and the subject, within half of the flash reach distance. Moreover, it should preferably be white or close to white, than it absorbs less flash light, and does not inject extra color casts.


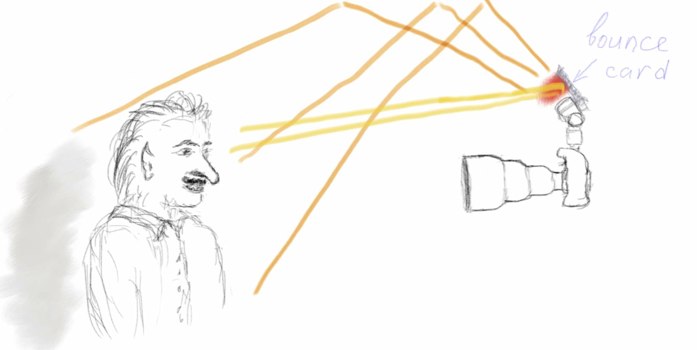
You can also play a nice trick to transform your single camera flash into two light sources. Some high-end flashes such as SB-910 have an embedded bouncing card. If yours does not, like my SB-600, make it yourself: just attach a piece of hard paper to the flash head (the rear part). Direct the flash to the ceiling or wall as described above, and put the bouncing card up. Most of the flash light will bounce from the ceiling and light the subject from above as before, but some light will also bounce from the card, opening up shadows on the subject.
Another great trick, if you have enough time, is to take the flash off camera. Let it illuminate the subject from some angle to have a nice lighting pattern and shadows. Fix the flash on a studio stand, tripod, or just put on something. In the worst case, hold it in your hand as far as possible from the camera. Many Nikon DSLRs can remotely trigger Nikon flashes with the built-in flash. If yours also does, you don’t need to buy any remote flash triggers.
If you combine flash light with artificial ambient light, it is a good idea to use color filters on the flash. These filters match the flash light white balance with tungsten and fluorescent light. This helps to achieve natural colors in post-processing. High-end Nikon external flashes come with color filters included. You can also buy them separately.
But how to set up the camera for flash photography? Unless you are playing with combinations of flash and ambient lighting (I will give an example later), the shutter speed is most probably irrelevant for low light flash photography. Its upper bound is the camera’s maximum supported flash synchronization speed. This is the technical limitation of the maximum shutter speed when using flash, which is usually 1/250 second on the high-end Nikon cameras, and 1/200 on Nikon D80 if I remember correctly. It does not make sense to use a longer shutter speed because the flash impulse lights only for a very short period of time, can be about 1/1000 sec. Thus, unless you want to capture also some ambient light, just set the shutter speed to your camera’s flash sync speed, and control the exposure only with the aperture and flash power. Do I say to set both the shutter speed and aperture manually?.. Do I mean the scary Manual exposure mode?.. Yes! I always do low light flash photography in a completely manual mode. Don’t worry, just like in the aperture priority mode, you will only have to play with one parameter (the aperture), because the shutter speed is fixed. Or maybe with two parameters, if you also control the flash power manually. It happens quite often that I don’t like how the automatic flash metering system performs, and set the flash power manually.
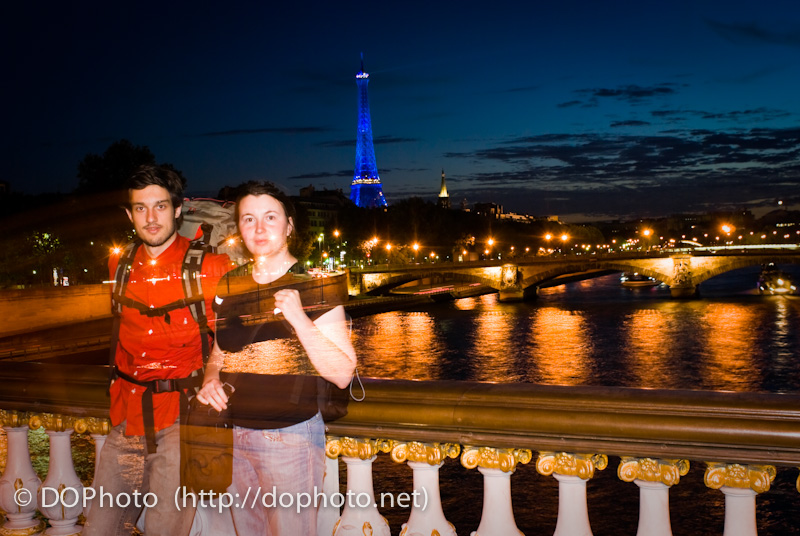
What do I mean by playing with combinations of flash and ambient lighting? Imagine you are shooting a person on a night landscape background. You want the person to be lit by flash (for sharpness, or to better separate from the background), but also want to capture the dark background details. In this case you probably need a long shutter speed for the background. The flash fires, and the camera keeps recording for some time. In this case you might want the person to be in a shade (the background to be brighter), otherwise the long exposure can add blurriness or some strange artifacts to the person. You can also make some fun and play ghosts as shown on the Paris night cityscape photo. For that, ask the person to run away from the frame as soon as the flash fires. The flash will make sure the person is well visible, and the long exposure afterwards will capture the scene behind where the person stood, producing the ghost effect.
Camera flash as fill light in bright conditions
This situation is much easier than the low light. You only have to learn to recognize when a fill flash can be useful. It is useful to fight a strong contrast between the lit and shaded subject parts, when the shaded areas become too dark. This happens, for example, when the subject is lit by a small strong light source, such as the sun: it has brightly lit areas as well as dark deep shadows. Or your subject is completely in shadow, with a bright background (perhaps lit from behind). You fill the shadows with the flash light, hence it is called fill flash.
In fact, the main reason I always shoot in manual mode with flash is to make it simple. After trying to control the combination of flash and ambient light in various automatic modes, I came to the firm conclusion that the easiest way is shooting in the Manual mode!


In most cases, unless your camera is super smart or you are very lucky, the only way to let the camera fire the fill flash is to force it manually. But you always set the flash manually, the auto flash is disabled, right?..
In a strong sunshine (the most common situation), you just fire a flash directly towards the subject. Even a built-in camera flash is often good enough if the subject is within its reach. The flash power is a way weaker than the sunlight, thus it is not a problem that it adds to the sun light. On the other hand, it brightens the shadow parts so that the shadow details become visible.

Is this a great solution? I do not think so. The best strong sunshine solution would be using reflectors to control the lighting. However, it is very difficult to operate reflectors without assistant(s). With time constraints and without assistance, a fill flash light is a good solution to improve results.
If the main light source is not so strong as a direct sunshine, you might encounter the problem that the fill flash will lighten both the lit and the shaded subject parts, not really helping to reduce the contrast. You will need more complicated solutions in this case, for example, using an off-camera fill flash directed precisely to the shaded area.
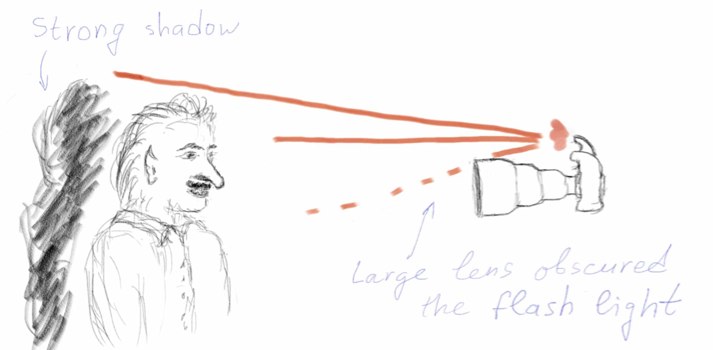
A warning from my experience: be careful with large wide lenses when using the built-in camera flash. Both with low light and fill flash photography. A large lens can partially obscure the subject, producing ugly shadows.
Don’t forget to check out Photo Sense: Photo Manager & Editor for Mac